The Mama's Girls

  • Home
  • Blog
    • Top Posts
    • Kid Activities
      • More Kids Stuff
    • Recipes
      • Healthy Recipes
      • Breads & Rolls
      • Breakfast
      • Candy
      • Cookies
      • Desserts
      • Salads
      • Sides
        • Side Dishes
      • Slow Cooker
      • Dinner
      • Snacks
      • Soups & Stews
      • More Food
    • DIY Projects
      • Crafts
      • Sewing
    • Home Projects
      • Decorating
      • Furniture
      • Cleaning
      • Helpful Hints & Tips
      • Laundry Room
      • Mommy Hacks
      • Repurposing
    • Tutorials
    • Health & Beauty
      • DIY Beauty
      • Essential Oils
      • Hair
      • Makeup
      • Remedies
    • Seasonal
      • Back to School
      • Birthdays
        • Birthday Ideas
      • Holidays
        • Valentine’s Day
        • 4th of July
        • Mothers/Fathers Day
        • Halloween
        • Thanksgiving
        • Christmas
    • Church
    • Fashion
    • Fitness
    • Freebies!
    • Gift Ideas
    • Photography
      • Photography Tips
      • DIY Photography
    • Events
      • Party
    • Misc.
      • Save Money
      • Products We Reccomend
      • Reviews
      • Summer Fun
  • Disclosure
  • Work With Us

DIY Water Resistant Labels

January 17, 2014 by Ali 5 Comments

DIY Water Resistant Labels

When it comes to labeling things, it is usually meant to be more permanent. I came up with a way to make simples labels more resilient from wear and tear (even water resistant!)

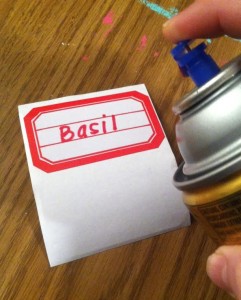
Next time you are labeling something, after writing/printing on the labels, spray a heavy coat of Polyurethane or Clear Acrylic Coating and let it dry completely before apply the labels. This will save you from re-doing it in a few months!

(P.S. If you are wondering about my painting/spraying mat in the picture below, I use a thin laminate board, kinda like this, over my table top to go under all my crafting projects for easy cleanup and furniture protection.)

Make labels water resistant and more durable with one simple step

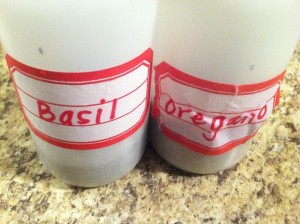
Here it is on my Nalgene Bulk Containers that I use for bulk spices. Basil was treated, Oregano was not. Both ran under hot water for 2 minutes. Cool huh?

Oregano - untreated DIY waterresitan labels

With all the free printable labels online, the sky is the limit!

Filed Under: Crafts, DIY Projects, Helpful Hints & Tips, Home Projects, Misc., Tutorials, Uncategorized Tagged With: diy, labeling, labels

« Dirty Diet Coke
Easy No Crock Pot BBQ Beef Sandwiches »

Comments

  1. Donna says

    January 17, 2014 at 6:00 pm

    You ladies are the best. I LOVE DIY stuff. your remedies for ” natural” fixes are right on. I no longer have my book where I collected “correct error” issues so I go to your site & am always able to find a remedy. Thank you

    Reply
    • Ali says

      January 20, 2014 at 11:19 pm

      Thanks so much for reading!

      Reply
  2. Izzabella Sayer says

    January 18, 2014 at 3:49 am

    Must try this as I use lots of labels on all sorts of things
    thank you for the share

    Reply
  3. Linda says

    July 29, 2014 at 7:58 pm

    Would this technique work for water bottle labels?

    Reply
    • Ali says

      July 29, 2014 at 9:51 pm

      I imagine so, they may not last as long but give it a shot and let us know how it goes! Thanks Linda

      Reply

Leave a Reply Cancel reply

Your email address will not be published. Required fields are marked *

Recent Posts

  • Remodel a Camper on a Dime
  • Free Minimalist Grateful Printable for Thanksgiving
  • Lemon Ricotta Muffins
  • Easter Egg Hunt Activities for Kids
  • Easy Candy Flowers
  • Pecan Pie Braided Bread
  • Holiday Hot Wassail
  • DIY Dollhouse Christmas Decor
  • Easy Magic Crocheted Hot Pads
  • Pumpkin Spice Honey Butter for Scones

Purchase our eCookbook with exclusive content

Shop

exclusive recipes  

Family Favorite

Posts May Contain Affiliate Links

Copyright © 2021 · Blossom theme by Restored 316